Tuesday, April 30, 2013

Shake It Up!!! Do the Pom Pom Blog Hop

I probably now know MORE about Pom Poms than I ever thought possible...
maybe even MORE than I really need to know!
Thank you
and
for really Shakin' Things Up Here!

I'm so excited to Shake My Pom Poms at ya'll today.
Since I
am 
the 
Thimblemouse....
I thought it only fitting...
that I should finally come up with a mouse
in a thimble.

Ready?

You're lucky I'm writing this post at the 11th hour...
so I'll spare you all the details of coming up with
my little mouse pattern
(we can save that for another time).

I figured a mouse in a thimble would be the way to go...
you would only see her body and arms...
I wouldn't have to worry about legs.
Wrong.
I She I?....ok SHE had to have legs...
and then she told me she was
'BORED'
just standing around in her thimble.
AND she wanted 
MORE Pom Poms!
So.....

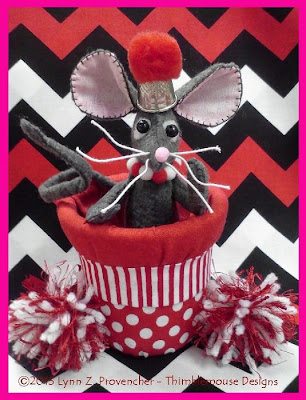
Here she is in her little
Pastel Pom Pom Boa
Tres Chic don't you think?
And what about that parasol?
She is one stylin mouse!

Of course...it's sometimes hard 
to post on the last day of a blog hop.
Why You Ask?
Because if I'm not totally finished with my project
(which ok...is usually the case)
sometimes....it's really...
REALLY...
hard not to be influenced by those 
awesome bloggers before me.

Take for instance
she made the coolest pom pom flowers from
Q-Tips!
Yes...Q-Tips!
She used over 900 Q-Tips!
I HAD to try it!

We had only 16 Q-Tips in the house.
Bright! 
But not much of a pom pom...hahaha

Then there was Joan over at
and her Bikini Pom Pom Pillow
(I still LOL when I think about it)

Hmmm...I wonder...

oh wait...
a thought...

Yeh...
Bikini Mouse with her
Pom Pom Sea Urchin
LOL

Ok...really and truly...
DID have 
an original thought all along.
You see....
 my goal is one day...
to become one of ...
Mdm Samm's Cheerleaders!


Of course early this morning I was strollin thru 
the Pom Pom blogs of the day...
dang!
Wouldn't ya know it?
had a Cheerleading Barbie!
With the cutest little Coca Cola Juke Box!
I almost ran out today to see if I could find one...
but I'm crazy busy getting ready for a quilt show...
so instead
I just took one last picture!
Do you think the signs are too much? 
LOL

Thanks for visiting!
I hope you smiled.
Be sure to see who else is
Shakin it Up 
Today!

April 30

Lynn ~ The Thimblemouse >"<

P.S...omgosh...I am posting after the midnight deadline...it's amazing I am posting at all...you just wouldn't believe the night...first there was a BUG...eeeewwww....one of the cats must have found it and brought it in to play....I couldn't concentrate to write this...eventually my BIG STRONG HERO SPOUSE saved the day and smooshed the bug! And then....I kept losing the internet connection...which would be no big deal...except that I was writing this blog! Yep...time for a 'thimblefull' of something...maybe THREE thimblefulls...and sleep...Niteys!
P.S.2....I do not believe this...now the post will NOT Publish...ok...just shoot me now! Make that FOUR thimbleFULLS!!!!



Monday, April 29, 2013

MeOwZa MoNDay -


Due to technical difficulties 
 will have to wait until next week
(code for: crazy busy and forgot we are in the middle of "shakin pom poms" - our mom won't let us use the computer unsupervised)

the KiDees
>^..^<

Monday, April 22, 2013

MeOwZa MoNDay - Mail Call and Stuff....

Until our mom learns to take more
furrrr-lattering pictures of us...
we say 
No More Pics!
(until next week of course)

Meanwhile, welcome to another
Time to CATch up on past weeks arrivals.
Mom got all kinds of goodies in the mail.

a Purrrrrfect prize for posting her
March New FO Challenge.
Thanks Barbara!
Barbara's KiDee...
Smitty
 even sent a little message
on the back of the envelope
MeOwHaHa
Maybe mom will let us help her with her mail next time!

>^..^< 

And from one of our mom's 
most favorite in the whole wide world 
of quilters/designers/and just all around fun gals,
came this CUTE little guy!
Our mom saw it a few weeks ago on Carol's blog and just 
HAD to have it! 
Just so you know...
Carol CAN  be bought!
MeOwZa!
Thanks Carol for making OUR "mama" so happy!
If you need a happy smile...be sure to visit Carol soon!

>^..^< 
Mom wanted us to let you know she is taking a little blogging 'break'.
She'll be back late on the 29th to reveal the winners of some goodies...
you have left a comment
--->HERE<---
...for a chance to win, right?

>^..^< 
She's a busy mouse these days...
getting ready for the
Tree City Quilters Quilt Show
May 4&5
and
Shaking up her Pom-Poms...
We're not sure what that means...
she doesn't tell us everything
but it has something to do with this...

A new blog hop...we shoulda known!
We think she said she is going to show off her
"pom-poms" on the 30th...
meooooow....
wonder if our Dad knows about that!

the KiDees
>^..^< 


Sunday, April 21, 2013

Happy Birthday Dear Spouse

Disciplined, Dependable, Hard working
Trustworthy, Persistent, Loyal
Calm, Patient, Honest

Agreed!
That's my loving Spouse to a "T"

I made him a virtual cake
and left it on his Facebook wall early this morning.
Yeh...a LOT of candles!
(Don't worry Bob, I won't tell just HOW many)
Let's just say....
Bob is...
I'm so glad he has a Good Sense of Humor!

For his B'day Celebration...
We took a little trip down the road to the
Starke Strawberry Festival.
I bought him his b'day present....
Boiled Peanuts!
Do I go all out or what?
Ok...truth be told....
he paid for them himself..lol

Bob thought he would treat himself to a 
Birthday afternoon of lawn mowing when we returned home...
(it's the Taurus in him...
that disciplined, hardworking thing)
but it rained...
so back in the house he came...
and I 'let him' clean the strawberries...
with a little wine...
 - a pretty good party game!

He also helped me clean out the fridge...
and we made a HUGE pot of soup
It really looks better in person...
trust me...
the steam kept fogging up the camera lens
(or maybe it was the smoke from ALL those candles on his cake)

There will be Crab Legs, baked potato & salad tonight
to go along with the soup...
and Strawberry Shortcake for dessert....
and we're looking forward to a
Hallmark Movie 'date' at 9.

Yikes...maybe we ARE getting OLD...
I saw this last night on a Google search...
and eegads...
I really understand it now!
someecards.com - Happy Birthday! Let's Party like it's 1999 or till the cows come home or least till 9:00pm!
No wonder no one asks me to be
their 'party planner'...lol!

Happy Birthday Spouse!!!

Lynn ~ The Thimblemouse >"<

Thursday, April 18, 2013

Spring Fling Blog Hop - My Day

I'm hooking up today with
for her simply mahhh-velous
It's an honor to be one of  the 20 designers included.
If you're just learning about this hop for the first time...
be sure to visit Whims and Fancies for links to
what's been...and what's still to come!

When I started to think about what I would do
for my 10" block foundation pieced offering...
I knew there had to be flowers for spring...
and from the get go I kept seeing a 'cat' in the mix!
(imagine that...lol)

This time it was Marvin's turn to inspire me.
awwww...wasn't he just the cutest lil' bambino?
Ok...before I pull out the entire baby album...
back to the subject
(no wonder it takes me forever to write a post...I'm so easily distracted)

I designed my first 'thought' on EQ.
Marvin (the adult)...looking at a flower.

Then a recent bittersweet memory grabbed me...
and wouldn't let go....

When Maggie suddenly left us in January...
our vet sent us this beautiful flower arrangement.
All the KiDees wanted to play eat were so intrigued with the flowers...
we had to put them behind closed doors during the day
while we were at work.
One evening after we'd been home awhile...
I found Marvin sitting on the counter next to the flowers...
he was ever so gently sniffing them...
one by one...
then he reached out a paw...
but just barely touched a petal.
He is our gentle giant.

Back to the drawing board I went...

 
Purrrr-fect.


True...the colors are a little brighter...more like summer...
but that pastel batik background brings it back to spring...
at least for me.

Here is the link for the PDF file to print out the foundation pattern.
Please remember your printer should be set to NO scaling.

For an easy to follow 'mirror image' design 
like you see below
and a chart listing what goes where, click here.

I told the Spouse this would be
a simple and quick post to write.
All I needed to do was...
show the block...
put a link for the pattern...
and be done.

He laughed.
He knows me so well.

This is a fairly simple block...
but if you are new to foundation piecing
( I'm going to assume you know the basics...
yes, I know...
one should never assume...
but I'm forever the optimist)
I thought maybe it would be helpful to show you how this block progresses.
Sometimes 'angles' can be scary.
Just take it one Unit at a time and you'll do fine.

Let's get started.
Here are the foundations you have (or will) print out.
Remember, you're working in 'mirror image' from the fabric finished block you see way above.
I like to lay them out to form the block.
(please refer to that second file I linked you to...for some reason, the "Unit" lettering did not print out on all the pieces and I haven't a clue about that.)

Complete each unit as marked.

Hint: When working with larger pieces of fabric
that might want to flop around...
I find a few BIG Basting stitches along the edges
really helps to keep all in place
I learned that 'trick' from Karen Stone.
She rocks!

Once all Units are finished and trimmed, I lay them back out...
again, forming the block.
Notice how I've 'grouped' the Units together.

I like to start with the easiest first - you know...
instant gratification is a wonderful thing.
I started with the "flowers".
 When I joined together the two flower petal sections...
I expected the outer edges to line up evenly...
they did not.
The section completed is 'straight' but the slight angle of the petals is enough
to cause what you see above. And it works, sewn as shown.

Next sew (as shown below)
-the flower "center" unit to the completed petals
-the ear to top of forehead
-neck/arm to bottom of head

Next sew paw section to head as shown below

Now sew ear section to top of head section

You're doing Great! One more seam to go!
TA-DA!

Now for the details.
Totally up to you.

For awhile my Marvin didn't have a mouth
(so much quieter that way)
But I finally drew one on and machine stitched it.
I was NOT happy.
I used that 'double' or 'triple' straight stitch.
(I'm sure it has a technical name...I'm technically challenged...oh well)
That's when I discovered tho I have 'that stitch'
on all of my machines...
some do it better than others...
sadly I used the 'other'
(see stitches on the right side of needle below - those are 'them' - yuck)
I found a nice rust colored floss...threaded up 3 strands...
and wrapped the machine stitches.
MeOwZa as the KiDees would say!
Break out the Catnip!!!Happy Dance Time!!!


I'm still trying to decide about "whiskers"
I mean...a cat's gotta have 'em, dontcha think?
Perhaps I will wait until the block is in a finished something or other...
and quilted...

Meanwhile as I lay in bed reading a book last night...
I felt a 'presence' ...
(more like 12 lbs of pressure on my stomach)
I took this picture...up close and personal...
Yep...definitely need whiskers!

Marvin hopes you enjoy his block.
I hope you will give one a try.
Be sure to take note that you can post finished
blocks from the hop in
Whims and Fancies special flickr group 
for a chance of winning a weekly prize,

Just a reminder...it's our Birthday Month and there are prizes to be given away.
Check the previous post and see what the KiDees are giving away!

Lynn ~ The Thimblemouse >"<


Monday, April 15, 2013

MeOwZa MoNDay - Celebrate KiDee Style

We simply want to say
THANK YOU
oh most awesome readers
out there in blogland!

Whether you're a faithful or sometimes follower...
or maybe brand new...
We think you're the cat's pajamas...
and we have some Give-Aways for You!

MeOwZa!
Feast your little cat eyes on all that!
Fabulous Felines 20" x 24" (approx) panel
and 5 Chubby Eighths!


Our momma the mouse made some
Purrrrrfect Little Pincushions
and she's going to add one to that
Fabulous Feline Bundle of Fun

And if that just doesn't tickle your whiskers...
guess what?
We will pick...
Not 1...
Not 2...
Not 3...
But FOUR!
Yes,there were
FOUR WINNERS


This Celebration wouldn't be complete....
 without a visit from our very special waggy tail friend...
So here she is...straight from the heavens above...
"woof"
There's a sweet little tute before you go.
Make your own
  Purrrfect Little Pincushion
from the directions below.

Thanks again one and all for joining in the fun. 
Don't forget to leave A comment...
a HI will suffice...
just so we know you were here. 

Come back on Thursday April 18th 
when we share our 10" foundation pieced block pattern for 

Quick Purrrfect Little Pincushion Tutorial
We rough cut the heart motifs from Laurel Burches "Fabulous Felines"
Adapt the instructions for your fabric shapes
Just follow the steps shown.
Have FUN!

Step 4 -  below, be sure to leave enough 
"cutting space" between shapes. I try to leave
at least 1"


Step 6 - I love my blanket stitch...
but you could use a "zig-zag" or any of your
favorite applique stitches. 
Even a tiny straight stitch could work.
Hint: Leave Long Tails when you start and finish - 
they will be pulled to the 'back' 
(see step 7) and trimmed...long tails make it easier for tying.

Decorative Stitching complete on pincushion front

Step 7 - Whenever I do ANY type of applique work, topstitching, etc...
I always bring my front threads to the back and secure...then hide.

Step 8 - Rough cut a piece of felt for the BACKSIDE - 
this should be slightly larger than the front for easier 
placement and stitching.

Step 9 - I use the same color thread (as my blanket stitch)
to straight stitch around the heart shape - 
my stitches follow the outer edge of the blanket stitch
(or you could use thread to match your felt foundation and 
stitch beyond the blanket stitch for another 'look')

Step 10 - Leave an opening about 2" for stuffing.
Secure and hide threads before stuffing.

Step 11 - I stuff before I trim the felt edges.
My favorite stuffing tool...an unsharpened wooden pencil -
I used the 'eraser' end for stuffing.


Step 13 - the end.

That's all Furrriends
Hope you Enjoyed this as much as We did!
Again...
We can't say this enough....

Lynn and Bob
The Thimblemouse and Spouse
and
The KiDees
>^..^<

LinkWithin

Related Posts Plugin for WordPress, Blogger...